A Vampyre Story
by Autumn Moon Entertainment and Crimson Cow
Walkthrough by MaGtRo November 2008
Gameplay: This is a third person point and click game. The main menu shows new game, load game and exit to windows.
The options are on the main page. The options are effects volume, voice volume, music volume, text, antialiasing options and quality lighting.
ESC key accesses gameplay menu. The menu has return to game, save game, load game, new game and exit to windows.
Right click access the inventory coffin. The cursor changes to a cross that has 4 selections: Fly or other actions, hand manipulations, examine and talk. The action options can be selected by click-hold-move to the selected option.
Note:
Spacebar skips introduction, cutscenes and dialogues.
To move Mona faster, click on another place at the same screen and then press the spacebar.
Right click the exit arrow to automatically change to the next screen.
The tab key shows all active spots in the screen.
Items that can be picked up later are shadowed blue in inventory.
Use all the action options on each item to hear all the dialogues and possible clues.
Castle Warg, Draxsylvannia 1895
Mona sings on stage that was made for her. Froderick the bat applauds. She wants to be back in Paris. Baron Shrowdy Von Kiefer arrives. Mona wants her wine. Mona is in denial about her drinking blood.
Shrowdy asks the first gargoyle for the key to the boathouse. Mona hears a voice.
The Baron leaves to get Mona's 'wine'. He follows a cloaked man. The monk and his assistant (vampire hunters) drive a stake through the Baron. Before his black mist flies away he says: Mona - I shall never set you free. The monk now wonders who Mona is. Mona is free of Shrowdy.
The book shows the credits and also has pictures that depict the background of Mona: from her childhood singing on stage, studying music and performing on stage. An admirer was introduced to her by her co-performer. The Baron falls for Mona and hypnotizes her.
Bridge: Mona tries to open the boathouse door.
Examine the first 3 gargoyles to learn the game manipulation. Click-hold-move the light of the cursor to select an action. Enter the castle. Right click the exit arrow.
Entrance hall: Check everything in the room. Use the tab key to see all active spots.
Try to take the rusty sword. Examine and fly to the banner. The banner shows the Von Kiefer family crest. They are seen in inventory to be taken later when needed.
Mona's bedroom: Climb the stairs and be at Mona's bedroom.
Check the dresser. Examine the mirror and see that it is a drawing. Try to tear the drawing. Pick up the perfume and body oil.
Take Froderick's fruit and nuts from the cage beside the dresser.
Check the vases left of the doorway. Husbands... Take the vase to be used later.
Try to sleep in bed. Check the vase of dead flowers by the bed. Take the perfume refill bottle under the bed.
Examine the picture on the left wall. Examine Shrowdy's toy box. Take animal noise toy from the toy box.
Balcony: Go outside to the balcony.
Examine Lake Warg. Talk to Froderick by selecting that option on the Froderick that is in inventory
Remove the snow over the planter box at right. There are still bulbs in the soil. Use Froderick from inventory on the planter box. Find out that they are Belladonna bulbs. Take the vase from inventory and use it on the planter box. Mona takes the vase automatically and uses it on the planter box.
Theatre: Go down to the Entrance Hall and then left of the fireplace.
Examine the note on the control panel. Try the levers and see that they are jammed. Froderick says that they are for the backdrop of the theatre and they are jammed because he dropped some of his nuts inside.
Check the dedication above the stage. It says Mona De Lafitte Memorial Theatre. Examine the vampire tragic and comedy masks.
Check the mounted head of bear, beaver, boar, buck and bunny on the wall.
Enter through the archway to be on stage. Exit the theatre.
Torture chamber: At the Entrance Hall, go to the foreground right entryway.
Take the mace to be used later from the wall by the entrance.
Check (examine, touch...) the poker and hot coals, chair of supreme discomfort, grinder, crushing device, clay man and crate full of dirt.
Try to open Shrowdy's coffin which has a lock and take Mona's bed to be used later.
Find the combination of Shrowdy's coffin.
Barb: Talk to the iron maiden, Barbara-Barb. Learn about the strange clay man, the Baroness' fascination with books and the torture of the clay man. Learn about Book of Shrowd and the Cabal that wears a special belt with a gold circle with a star and an eye at the center of the star. The first number of the combination of Shrowdy's lock is zero.
Talk to Ozzy, the bizarre fountain at right. He can't talk with water coming out of his mouth.
Rats: Examine and talk to the rats in the next room. The rat pack is made up of Frankie, Joey, Sammy and Dean.
The main rat wants something in exchange for telling Mona about the pipes. Give the fruits and nuts to the rat. Dean was sent to stop the pipes but was 'lost' in the process.
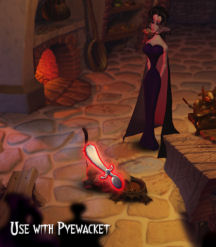
He wants Pyewacket, the Baroness' cat killed and to bring her collar as proof before he gives information about the Book of Shrowd.
Ozzy: The water stopped flowing. Talk to Ozzy now. Learn about Shrowdy's combination. He knows only 2 numbers: 3 and 7. 7 is the final number.
Shrowdy's coffin: Open Shrowdy's coffin by taking the combination from inventory and using it on the coffin.
Examine and then move Shrowdy's pillow. Examine and take the Draxylvanian Tribune. Examine Mona's pictures.
Dungeon: Go down the stairs.
Check everything: the spike on wall, gate to hell, red stains, smiley and graffiti. Take the unlit torch to be used later.
Open the Pit: Try to open the pit by pulling the handle.
Use the body oil on one of the hinges. Mona used all the oil in one of the hinges.
Go to the crushing device-chair upstairs and crush Froderick's nuts and fruits.
Use the empty bottle on dripping oil to collect natural body lotion made from Froderick's fruits and nuts.
Go back to the pit. Use the newly made body lotion on the other hinge.
Pull on the handle now. Use the unlit torch on the burning torch on the wall.
Use the now lit torch on the pit. There are piles of bodies down there and it smells so bad. Use the mouth icon on the pit.
Bridge: Exit the dungeon and torture room. Go back outside to the bridge.
Look down to the water and see Inky, the Lake Monster swimming in Lake Warg. Talk to him.
See Lake Shore at bottom left of screen.
Gargoyles: Use the mace on the gargoyles.
Rufus: Talk to Rufus, the first gargoyle. Learn about his story. He's a snooty one and is obsessed with smell and cleanliness.
Use the down arrow to see the rest of the dialogue.
Look up and see the turret bottom and home of Edgar, the raven.
Edgar's roost: Fly up to Edgar's place.
Talk to Edgar. He feels out of touch here. Learn why Rufus doesn't like him.
Get the key from Rufus: Use the newspaper on Edgar. In exchange get a clothespin.
See an angelic statue on the tower's wall and washtub in front of Edgar's roost.
Push the statue on Rufus below. Hmmp... Use the sword on the statue. Rufus is not under the statue.
Go back to the pit. Use Froderick on the pit. Use the clothespin on Froderick to get Froderick with clothespin to be used later.
Then use Froderick with clothespin on the pit. He gets corpse jerky to be used later.
Go to Edgar at his roost. Use the corpse jerky on Edgar. Watch.
Rufus moves. Push the angelic statue now. Oh, poor Rufus.
Fly down and talk-taunt Rufus until he gives the key.
Tower: Use the key on bridge door.
See the boat. But the oars are gone. The ghost of Shrowdy appears and he used the oars as a cross that Mona can't touch.
Dining room: Climb up the stairs. Look around.
Take the knife and the straw from the sippy cup that is on the table. There's a sugar bowl on the table also.
Kitchen: Go to the right of the dining room table and be in the kitchen.
Check everything in the room. Take can of cat food from the shelf by the doorway.
Check the hole left of the cauldron.
Get the cat's collar for the rats:
Use the demonic can opener. See the cat arrive, checks the food bowl and then runs away.
Use can of cat food on the can opener and automatically place it on the bowl. The cat tastes the cat food and runs away.
Take the Siamese cat food from the shelf. Open the Siamese cat food light and automatically place it on the bowl.
Talk to Pyewacket, the Baroness' familiar. She guards 2 very special books in the library.
Use the knife on Pyewacket and get her collar.
Torture Room: Go back to the Torture room by going back to the dining room and then through the door across the table.
Use Pyewacket's collar on the rats. The rat says to pull and put back 2 books in the library. There is now 2 Secret Book Titles in inventory. This will open the way to the Baroness' laboratory.
Baroness' library: Go back to the tower and then up the stairs.
Check items in the room. Take the crayon from the table. Examine the coloring book. It has a drawing of a newt.
Use the 2 Secret Book Titles from inventory on the right book shelves. Nothing happened. The rats lied.
Look close at the books on the right book shelves. They have symbols on the book's spine.
Look close at the sticky note on the desk. Use the crayon on the blank sticky note. Read it to see titles of 4 books: A Teen Campers Guide to Crystal Lake, Draxsylvania on 2 pints a day, The Dark Night Returns and Sharpening your Fangs: A Parent's Guide to Raising the Perfect Vampire. These titles might be different in your game.
Try to read the Baroness journal on the desk.
Find out the correct books.
Go to the kitchen. Talk to Pyewacket. She's so tired because waiting for the rats to come to the kitchen keeps her awake.
Go back to the rats and talk to them. Find out that they plan to raid the kitchen at 3 AM.
Go back to the cat and tell her the time of the raid.
In return she mentions that all you need to know is to switch the 2 books titles.
Go back to the library and use the switch the 2 books from inventory on the right bookshelf. The left bookcase moved.
Baroness' laboratory: Enter the passage behind the moved bookcase.
Bridge: Check all items. Check the liquid flowing to form the river. There's a mysterious object inside the flowing liquid. Froderick suggests plugging the nose of the demon face.
Read the chalkboard.
Formula for creating carbon based (organic) acid:
3 beakers - purple hearts, green clovers, orange diamonds
1/3 demonic snot, 1/3 color drink, 1/3 color drink
Cool first, warm second, cool last.
Look for pink hue.
Heat to a boil in ceramic cauldron till it is glowing red hot - use demonic heat.
Pour on carbon based life form and enjoy.
The magical orb controls the power here. Check the Bunsen burner, refrigerator below the burner and the 3 beakers of hearts, diamond and clover. Look close at the combination lock held by demonic imp.
Open the combination lock:
Look close and see 3 rings around a central circle with colored gems.
Each circle has symbols. They look familiar.
Go back to the library and check the spine of the 4 books that are on the sticky note list.
A Teen Campers Guide to Crystal Lake Basin has green diamond.
Draxsylvania on 2 pints a day has a spiral.
The Dark Night Returns has a quarter moon and star symbol.
Sharpening your Fangs: A Parent's Guide to Raising the Perfect Vampire has a Z.
Go back to the combination lock and use the lock.
Turn the central circle to have the green diamond on top.
Turn the outside ring to have the spiral on top.
The second from outside ring to have the quarter moon with star on top.
Turn the third from outside ring to have the Z on top.
The lock opens and the flowing snot stops.
Book of Shrowd: Take the Book of Shrowd from the central stand. See there are symbols, gems and hands.
Open the book and then click twice to see the recipe to make a golem.
The recipe calls for: belladonna, bone powder of a murdered virgin, gargoyle breath and eye of newt.
Mix in a crystal vial and spray on man shape statue of earth or stone.
Collect ingredients for making a golem:
Open the refrigerator and take Scotchman Miraculous growth fertilizer, dry ice, can of yellow D'Mellow, can of Blueberry Sucker Punch and can of diet Cherries Gone Wild all to be used later.
Eye of newt: Go back to the right and out to the library. Examine the coloring book of Shrowdy.
Use the knife on the eye drawing of a newt.
Gargoyle breath: Go to the bridge.
Use the perfume bottle on Lake Monster swimming in Lake Warg. Do not refill the perfume bottle! Thanks, Bonniesan.
Use the empty crystal perfume vial on the head of Rufus. Rufus refuses. Use the clothespin on Rufus' nose.
Then use the empty crystal vial. Wait until he sucks in air and immediately click on him to get his exhale. You might need to do this several times before Mona says 'yes' and get crystal vial with some ingredients.
Belladonna: Go back to the balcony off Mona's bedroom.
If you have not done it yet, clean off the snow from the planter box. Use the growth fertilizer on the Belladonna bulbs in the planter.
Take a Belladonna flower.
Bone powder of murdered virgin: Go back to the Baroness' laboratory off the library.
Dungeon: Go to the left end of the bridge and be at the dungeon.
See a skeleton and windows on the other side.
Read the note right of the lever. Learn that the skeleton has her virginity confirmed.
Pull the platform lever on the wall and see that the platform is stuck. The controls are broken. Fly to the skeleton. The effort was useless - the bones are fragile.
Find a way to lower the platform.
Prepare organic acid:
Go to the potion table at left and look close at the 3 beakers.
The recipe starts with:
3 beakers - purple hearts, green clovers, orange diamonds
1/3 demonic snot, 1/3 color drink, 1/3 color drink
Purple heart - Use the heart beaker on the demon spout to get demon snot.
The Cherry soda is diet. Go to the dining room and add sugar to the Cherry soda.
Add the Cherry soda with sugar (red) and then Blueberry Sucker punch (blue).
This makes a purple solution.
Orange diamond - Use the diamond beaker on the demon spout to get demon snot.
Add Cherry soda with sugar (red) and then Yellow D'Mellow.
This makes an orange solution.
Green clover - Use the clover beaker on the demon spout to get demon snot.
Add Blueberry Sucker punch and then Yellow D'Mellow.
This makes a green solution.
Go to the Bunsen burner above the refrigerator.
The recipe now states: cool first, warm second, cool last; look for pink hue.
This is based on the color of the solution.
Add cool colored solution - purple heart (or green clover) to cauldron above the burner.
Then add warm colored solution - orange diamond to cauldron.
Then add the other cool colored solution - green clover (or purple heart) to cauldron.
Mona will say 'it worked' when it bubbles and turns pink.
The cauldron with ingredients and an empty beaker are now in inventory.
Go to the kitchen.
The recipe now states: heat to a boil in ceramic cauldron till it is glowing red hot - use demonic heat.
Try to turn on the Bunsen burner and see that the flame is lame. :)
Go to the kitchen and place the cauldron with ingredients on the warm furnace. Nothing is happening.
Go back to the laboratory and fill the empty beaker with demonic snot from the demon spout.
Go back to the kitchen and use the beaker with demonic snot on the warm furnace. Wow!
Mona automatically takes the acid - red hot solution in the cauldron.
Go back to the skeleton of the virgin in the dungeon.
Use the acid on the wooden column of the stuck platform.
The skeleton falls down to a pile of bones on the platform. Try to take pile of bones. The Banshee stops them.
Talk to the ghost. Oh, how I long for the morning! Let's give her the morning.
Theatre: Go outside the dungeon. Exit up to the hole just outside the entryway to the dungeon and above the bridge to be at the theatre. All the running around could have been skipped if they just opened the trap door.
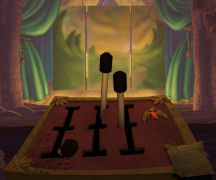
Control panel: Go to the control panel behind the theatre seats.
Mona refuses to use the straw on the mess on the control panel.
In inventory combine Froderick and straw. Use Froderick with straw on the messy area or the control panel.
Use the levers to get a nice back drop.
There are 3 levers. Each lever has 6 positions. They drop frames of sceneries on the stage. A set of 3 makes a complete backdrop.
Move the levers until a morning or dawn backdrop is seen.
If a mistake is made, move the levers to: left lever - bottom left, middle lever - top left and right lever - bottom right. This raises all 3 screens up.
Move the levers to: left lever - bottom right, middle lever - top right and right lever - middle left. See a sunrise backdrop.
Go to the stage and use the knife on the backdrop to get theater flat.
Go to the right curtain and be at the entryway to the dungeon.
Examine the dungeon windows. Use Froderick on theatre flat. Use Froderick with theatre flat on the dungeon window.
Froderick flies away to get the theatre flats. Mona tries to make small talk with the ghost.
The backdrop is on the windows but still the ghost is not convinced.
Examine the animal noise toy in inventory. Click on rooster to move the arrow. Use the animal noise toy with Froderick. Use Froderick with animal noise toy on window. Hear the rooster crow.
The ghost is convinced that it is morning and Wilhelm is coming. She flies away. Take a bone.
Go to the torture chamber and use the bone on the grinder on the table to get skeleton dust.
Make a golem:
Now that we have all the ingredients, let's make a golem.
Use the skeleton dust, the belladonna and the eye of newt drawing on the crystal vial that has the gargoyle breath to get mixed potion ingredients.
Examine the headless clay man. It is a golem but no head.
Go to the bridge. Use the banner on Rufus' head to get Rufus' head in tapestry.
Go back to the torture chamber. Use Rufus' head in tapestry on the headless clay man.
Use the mixed potion on the clay man with Rufus' head.
Watch the animated golem. Mona orders the golem to take the oars from Shrowdy.
Watch the struggle which ended up with a destroyed boat and lost golem.
Find a way to get through Lake Warg:
Look through the window and Mona sees a man rowing on a boat. But Inky ate him.
Use Mona's coffin on the water. Mona and Froderick rows out of the castle
Inky blocks the way. Refill the perfume vial with perfume and use it on Inky. That didn't work.
Use the dry ice on Inky. Mona throws the dry ice on the bridge and Inky swallows it.
Go down to the boathouse and use the coffin.
Inky was slowed down by swallowing the dry ice. Now use the perfume on him.
Mona asks directions from the vampire hunters who killed Shrowdy.
Lakeshore:
Madame Strigo: Mona lands at the shore and is compelled to find Madame Strigo, the gypsy.
After meeting with Madame Strigo, be at the coffin parked at the lakeshore.
See Otto checking it out. Talk to Constable Otto Van Pelt who is checking out the coffin. Learn about the surrounding areas: Vlad's Landing, Gothford Falls and Scarlet Meadows. Look around the area.
Go right to the gypsy wagon. Madame Strigo gives Vampire for Dummies book.
She explains about things to get and to do. She gives a flier for a horse for sale.
Learn the basics of being a vampire. Read the Vampire for Dummies to learn about Domicile Defenses, Wearing Black and Biting and Sucking. Take the test on the next page and Mona passes the test. She's still in denial. There's Vampire bite in inventory now.
Take the bottle of ink from the bottom shelf by Mona. Exit the gypsy wagon.
Get the coffin: From the gypsy camp go to top part of the road.
Use the vampire bite on Constable Otto. Mona automatically brings the coffin back to the gypsy camp.
Try to get grave dirt and cart: Go forward to the road.
Cemetery: Go back to the Lakeshore. Go left and be at the cemetery.
Read the sign by the gate. Try to enter and see that the crosses prevent Mona from entering.
Go back to the camp and then go right to the road.
Get the horse and check Vlad's Landing: Go right from the gypsy camp.
Spatula shop: Try to enter the Spatula shop at right. There is a strand of garlic hanging right of door. No entry then.
Stable: Go right of the shop and see the stable. Check and try to take the snowman at the yard.
Enter the stable. Examine the horse with a horse boot.
Open the shed door. Take the saddle blanket to be used later.
Exit the stable and go right.
Dress shop: Look inside through the window. The cross above the door prevents Mona from entering.
Back of restaurant: Go a bit to the right outside the shop and see a window. Check the oil vat under the window.
Nail Salon: Go right and talk to the woman of low moral fiber.
Constable Bud Crane: Go down the stairs and cross the bridge. Talk to Constable Crane standing beside the stadium.
Alley: Enter the alley left of Constable Crane. Take the boomerang from the box at right.
Spatula shop: Go back to the Spatula Shop. Use the boomerang on the garlic right of door. The garlic is removed.
Knock on door and talk to the woman from New Jersey. She can't open the door because her son threw out the key.
She will give the horse if Mona can find the key to the door.
Get the key: Look at the broken window at top of house.
Fly down the well that is across from the house and look around.
See the frozen key on the ground. Take the bucket to be used later.
Fly out the well and go back to the gypsy camp. Use the bucket on the kettle of mysterious stew.
Fly back to the bottom of the well and use the kettle of mysterious stew on the frozen key.
The stew was frozen when poured on the key.
Do the same thing again. This time wrap the saddle blanket on the bucket first before getting the stew.
Get Froderick to pick up the key.
Knock on the door of the spatula shop. Mona uses the key and gives it to the woman.
The woman introduces Mona to Buttercup. Buttercup is tied up at the gypsy camp.
Get black material: Go back to Vlad's Landing.
Go right from the gypsy camp. Go right until the stables. Take the snowman in front of the stables.
Get close to shop door: Go right and see the dress shop. Mona can not enter because of the cross above the shop.
Use the snowman's head on the cross. It did not work.
Get another snowman's head in front of stable. Use the ink from the gypsy wagon on the snowman's head.
Go to the dress shop and use the blackened snowman's head on the cross. That worked.
Enter the shop: Go to door and open the door. Mona can't go in because she needs to be invited in.
Watch as the slovenly man run the woman ragged. The kids on the loft are playing wildly.
Look at the sign on the door. Turn the sign over and it states 'Come on in.'
Take the sign. Use the sign on the woman and Mona will ask the woman to read it to her. The woman invites Mona in then.
Talk to the slovenly man. Harrumph. Talk to the dress shop lady.
Try to take the baby dress hanging on the display window.
Get the kids to sleep: Go up the loft and talk to Siegfried and Roy. They want the song being sung at the stadium: Who Let the Wolves Out.
Find the lyrics to the Who let the Wolves Out:
Go to the stadium by exiting the shop, going right and pass Iris at the Nail Salon.
Climb the stairs right of Constable Bud Crane. Talk to the other Constable inside the stadium. Hmmm...
Go to the alley left of Constable Bud Crane. Look at the barred window of the backdoor. Try to fly through and Froderick volunteers to try it first. He couldn't go through.
Go back to the restaurant window right of the dress shop. Use Froderick on the oil vat under the window of the restaurant.
Use Froderick covered with cooking grease on the window bars of the door. It was a tight fit for him and the door is barred from the inside. Mona joins him.
Inside the stadium, examine the play list on top of the cabinet. Who Let the Wolves out was already played. Talk to the Band leader. Then open the play list and Froderick says to distract the band leader.
Divert the Band leader: Exit the stadium.
Talk to Iris Vivien, the woman of low moral fiber. After talking to the constable on guard inside the stadium and band leader, she agrees to distract the band leader in exchange for getting rid of Constable Bud Crane.
Take care of Constable Bud Crane: Go to the alley beside the Constable.
Go farther down from the alley. See a wide space with crates. Check the windows where people are partying.
There's a manhole in the foreground blocked by 2 crates. Move the 2 crates to the side.
Sweet talk Froderick to wear the baby dress by combining Froderick with the baby dress.
Use Froderick with girl's dress on Constable Bud Crane by the stadium door.
Watch cute Froderick pass before the Constable and later cries for help.
Mona hides close to the manhole. Automatically, Mona does her biting away from the lit windows.
Take the badge from Constable's shirt.
Talk to Iris again. Mona gives Iris the All pass badge to the stadium.
Watch Iris and the band leader have a nice repartee.
When possible, use the Who let the Wolves Out inventory on the play list. Mona writes the song on top of the list.
To stop the repartee, use Froderick on Iris. Hear the band play the music and Mona dances to it. The song is in inventory.
Go back to the kids at the dress shop loft and use the music on one of the kids. The lullaby worked.
Get time for Mina Stoker:
Close the door: Mina says that now the kids are asleep, she can turn off the fire in one stove.
Go outside and examine the chimney on the wall of the shop. Fly up to the chimney and then fly in the smoke stack. Check the graffiti on the walls and the skeleton of Uncle Rudy.
Select change to human form when the cursor is on the fireplace flue. Mona falls down to the kitchen. Mina shoos the bats out of the kitchen after they made a mess. Mina stays to clean the mess in the kitchen.
Take the chair left of the door. Use the chair on the kitchen door. Mina is locked in the kitchen.
Talk to Bruno, the slovenly man. Use the vampire bite on Bruno. Mona scares Bruno and then bites him. Bruno falls asleep.
Release Mina from the kitchen by taking the chair off the door. Mina is very happy and gives the bolts of black cloth for free.
Get grave dirt and cart:
Cemetery: See that crosses in the cemetery are all covered by black cloth.
Go forward to the house on top of the hill. Examine the cart behind the office.
Enter and look around the office. Take the shovel, pickaxe and bellows.
Examine the graveyard map on the wall to look for Mona's grave. Froderick finds it in A1 13.
Shrowdy appears and demands that Mona return to castle. He locks the 2 inside the office.
Escape from the locked office: Examine the furnace, door and window.
See an empty water basin under the downspout that collects water.
Snow covers the roof and the tree branches above the roof.
Increase the fire in the furnace by throwing perfume in the furnace. The increased heat melts the snow on the tree branches filling the water basin. The water in the basin freezes.
Use the shovel on the window to tilt the filled water basin. The ice falls in front the door.
Use the pickaxe on the door to have more space on the base of the door.
Use the shovel in the furnace to make it red hot. Use the heated shovel on the door. It melts the ice and it formed a puddle of water on the floor of the office.
Use the bellow on the puddle of water. Use the bellow with water on the furnace. The fire is put out.
Exit through the furnace. The bats fly out of the office.
Get out of the cemetery: See Froderick fill another box of grave dirt.
Shrowdy appears after taking the black cloth from the crosses. Mona is trapped in the cemetery.
Use Froderick on the wagon with dirt. Mona told Froderick to steer while she pushes the wagon to start it rolling downhill.
Push the wagon to start going downhill. Mona flies above to be away from the crosses.
See Madame Strigo watch the vampire hunters in her crystal ball. Learn that she can remove the curse.
Madame is distracted by something flying outside. She goes out to check and is surprised.
'Madame' gives instruction to Mona to go to a friend of hers, Doctor Rigor Mortis.
See you in Chapter 2.
This document may not be distributed without express written permission of the author and the content may not be altered in any way.
For Questions or Comments on this Walkthrough,
Please write to: MaGtRoCopyright © 11/2008 MaGtRo
원문: http://www.gameboomers.com/wtcheats/pcVv/avampyrestory.htm
'IBM-PC Games > Adventure' 카테고리의 다른 글
| [고전] 툼레이더 (Tomb Raider) 도스박스 구동용 (0) | 2009.11.05 |
|---|---|
| [공략] 원숭이 섬의 비밀(The Secret of Monkey Island) (0) | 2009.07.28 |
| [고전] 아스(Ash.) (1) | 2008.11.10 |
| [고전] 지구수비대 독수리오형제 (0) | 2008.11.06 |
| [고전] 홍길동전2 (0) | 2008.11.06 |


